Considering the cozy allure and practical benefits of a wood-burning stove, it’s no wonder many homeowners are eager to install one themselves. While enlisting a WETT-certified professional is the safest route, the allure of a DIY project can be irresistible. However, before you embark on this endeavour, you must acquaint yourself with the essential installation requirements. From navigating initial permits to ensuring a seamless final inspection and even the nuances of ongoing maintenance, there’s a wealth of oft-overlooked prerequisites that can make or break your wood stove installation. This guide will delve into additional critical considerations to ensure compliance, safety, and longevity for your wood-burning stove. While this guide offers valuable insights, it’s imperative to adhere to local codes and regulations diligently.
Certified vs. Uncertified Wood Stove Installation
While there may not be a conventional instruction manual for uncertified wood stoves, there are precise requirements that must be adhered to. Although not neatly packaged in a manual, these requirements are crucial for ensuring safety and compliance during installation.
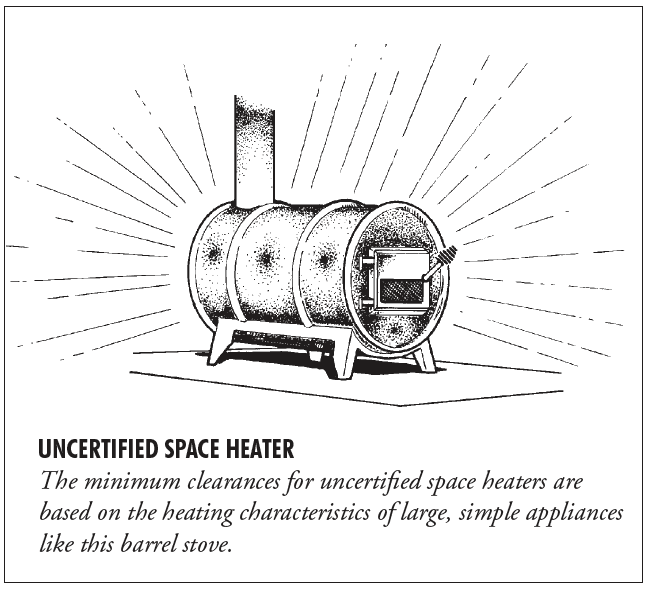
Uncertified wood stoves encompass a diverse array of units, ranging from homemade constructions to unique artisanal pieces crafted by skilled hands. Additionally, antique stoves lacking certification labels fall into this category. While these stoves may not have undergone formal laboratory testing, there are still clear guidelines that must be followed, particularly concerning clearance distances from combustible materials.
Navigating the installation of uncertified stoves requires a thorough understanding of these specific regulations. Instead of relying on a step-by-step manual, installers must acquaint themselves with local building codes and regulations governing wood stove installations. This ensures that the stove is positioned safely and that the surrounding environment is protected from potential fire hazards.
In this post, our focus is on illuminating these often overlooked requirements for installing uncertified wood stoves. By providing insights into clearance regulations, safety considerations, and best practices, we aim to empower DIY enthusiasts to undertake their installations confidently and responsibly. So, if you’re installing an uncertified wood stove, rest assured that with the proper knowledge and precautions, you can create a cozy and safe heating environment in your home.
Get Your Permit for your Wood Stove Installation!
Ensuring you obtain the necessary permit before embarking on your wood stove installation is not just a mere formality; it’s a critical step with far-reaching consequences. Yet, it’s surprising how often this crucial process gets overlooked in the excitement of setting up a cozy wood-burning stove.
In Alberta, as in many jurisdictions, securing a permit for a wood stove installation is not just advisable; it’s mandatory. Municipalities and Authorities Having Jurisdiction (AHJs) across the province uniformly require permits for such installations. Neglecting to obtain one can have significant repercussions, impacting your property value and insurance coverage. Moreover, the financial implications can be severe, potentially resulting in hefty fines for non-compliance.
Therefore, before you consider unboxing your new wood stove, prioritize securing a permit. It’s the first and most crucial step in ensuring your installation is legal, safe, and compliant with local regulations. By taking this proactive approach, you protect your investment, ensure your peace of mind, and demonstrate your commitment to responsible homeownership. So, don’t skip this vital step; get your permit and set the stage for a successful and worry-free wood stove installation.
Figure Out Where You will Install Your Wood Stove
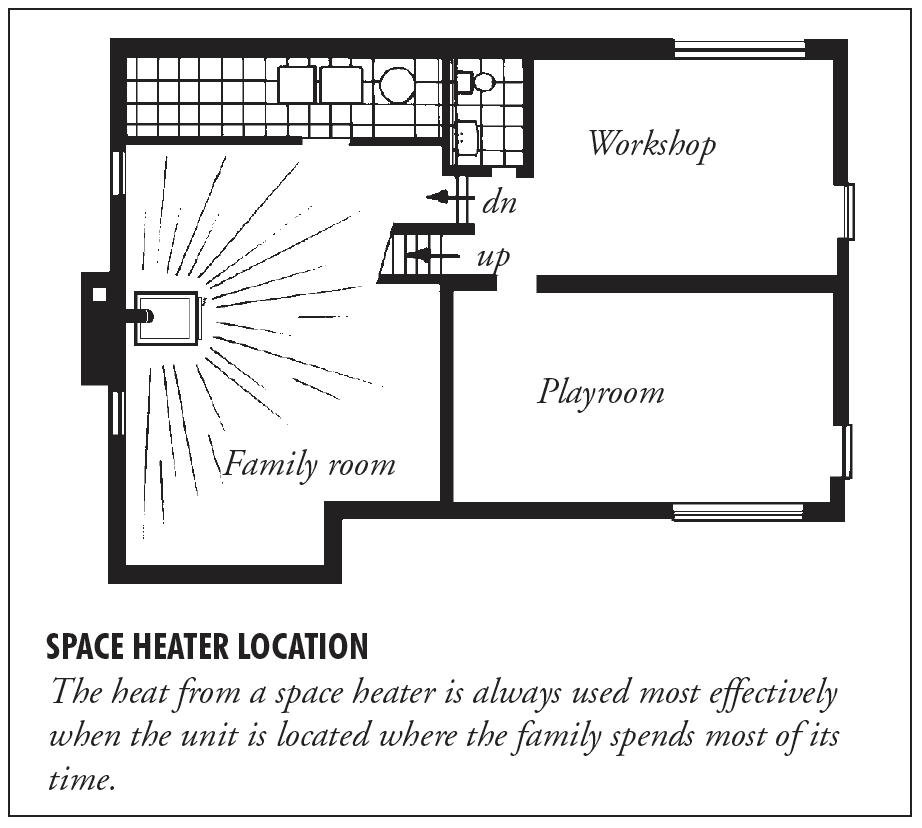
Choosing the right spot for your wood stove is crucial for comfort and safety. You don’t want to plunk it down just anywhere in your home. Ideally, you want to install the stove in a central location where you spend most of your time. This way, you’ll get the most out of the heat and be able to keep an eye on the stove more easily while it’s burning. Plus, if there are any maintenance issues, you’ll spot them sooner.
Putting the stove at one end of your home might seem like a good idea, but getting the heat to the other end can be challenging. To help distribute the warmth evenly, you can use fans to circulate the air.
Avoid installing the stove near the base of the stairs. If something were to ignite nearby, it could block your escape route.
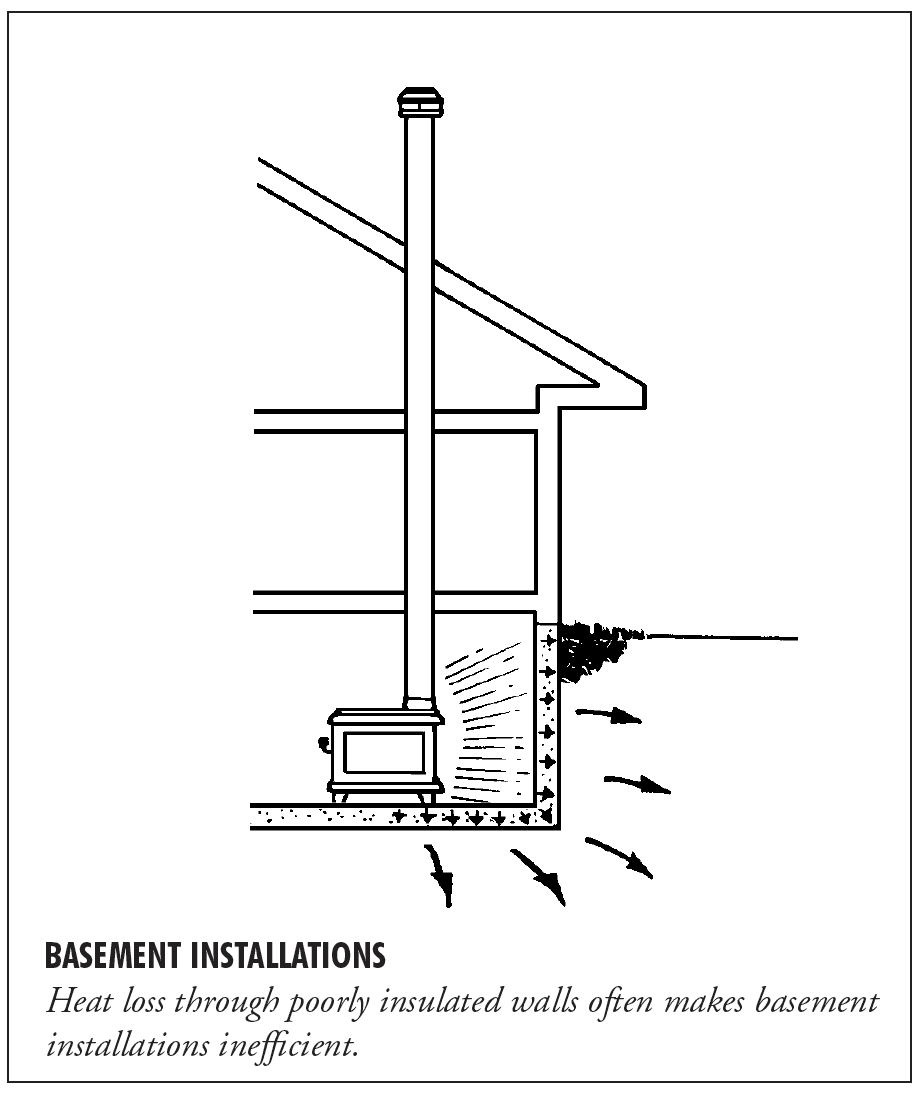
Are you thinking about putting the stove in the basement? That can work, but make sure the walls down there are insulated. This will help keep the heat in and prevent it from escaping. If you do install the stove in the basement, consider putting grills on the floor above. This will allow the heat to rise more freely to the main floor, keeping your entire home cozy and warm.
Clearances for Your Wood Stove Installation
One of the most critical factors when installing your wood stove is clearance. Clearance refers to the space around the stove to ensure proper ventilation and safety.
Whether installing a factory-built wood stove or an uncertified one, ensuring adequate clearance is essential. Factory-built stoves usually have low clearance requirements, meaning they can be placed closer to walls and other combustible materials. However, uncertified wood stoves often require more significant clearance distances to reduce the risk of fire hazards.
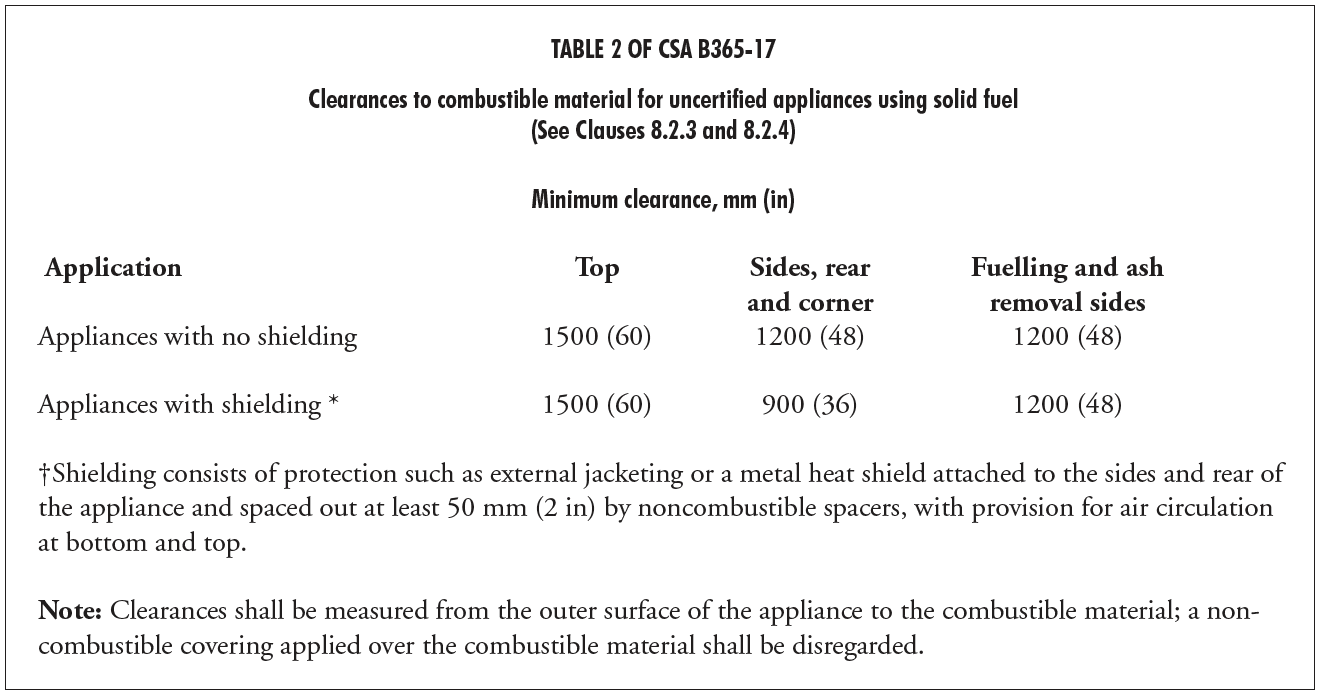
Clearance requirements for uncertified wood stoves can vary significantly. In some cases, you may need as much as 48 inches of clearance in any lateral direction. This ensures that there’s enough space for proper airflow and prevents nearby materials from overheating and potentially catching fire.
Refer to the following chart to determine the specific clearance requirements for your uncertified wood stove. By following these guidelines and ensuring adequate clearance, you can minimize the fire risk and enjoy your wood stove safely and comfortably.
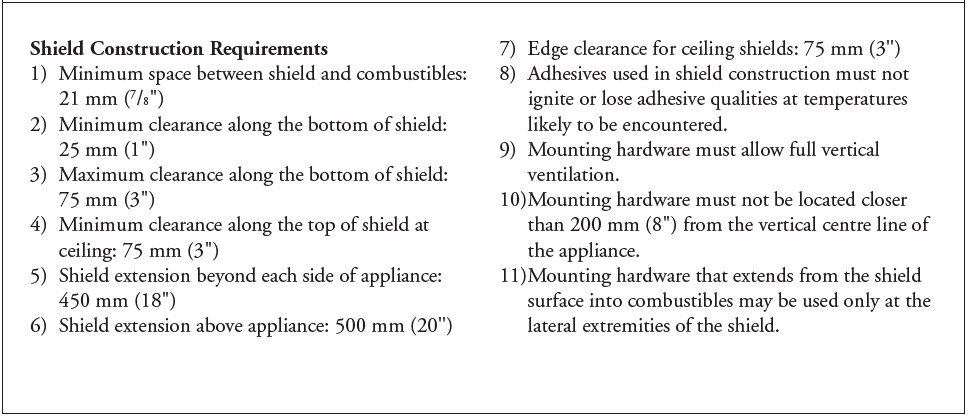
Reducing the Required Clearances with Heat Shielding
Meeting clearance requirements for wood stoves can sometimes be tricky, mainly if your home has limited space. However, there’s a solution: heat shielding. Heat shielding can significantly reduce the required clearances, enabling installing your uncertified wood stove in tighter spaces while still maintaining safety standards.
Heat shielding creates a barrier between the stove and nearby combustible materials, such as walls or floors. This barrier helps dissipate heat more effectively, reducing the risk of fire hazards. Heat shielding can reduce clearances by up to 67%, which is impressive. With heat shielding, you could potentially bring an uncertified wood stove’s clearance requirement down to just 12 inches – a considerable improvement!
If installing heat shielding, follow this handy table that outlines the necessary specifications. By adhering to these guidelines and properly installing heat shielding, you can enjoy the warmth and ambiance of your wood stove while ensuring the safety of your home and loved ones. So, if you’re struggling to meet clearance requirements for your wood stove, consider incorporating heat shielding into your installation plans for a safe and efficient heating solution.

Floor Protection Requirements
Ensuring the proper protection of the floor surrounding your wood stove is crucial for preventing fire hazards and maintaining the integrity of your home. Two essential types of protection are required for the floor beneath and around a wood-burning stove, each serving a distinct purpose.
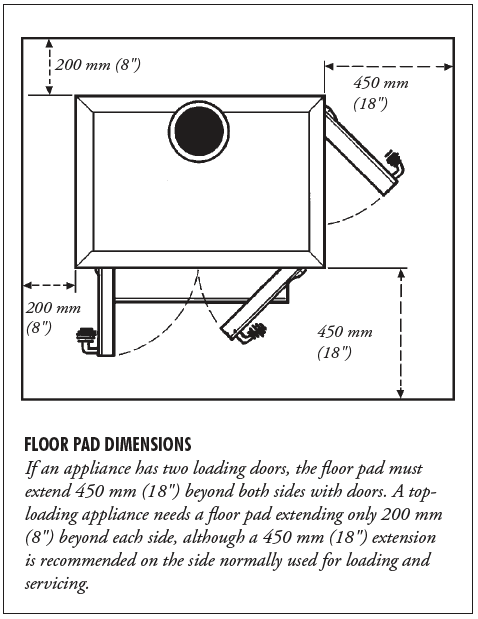
Firstly, a floor pad is necessary to safeguard against falling embers and sparks. This floor pad must extend beyond the stove on all sides to provide adequate coverage. Specifically, it must extend 18 inches beyond any side with a loading door and 8 inches beyond all other sides. The material used for the floor pad must be continuously non-combustible to withstand the heat generated by the stove.
Ceramic tile is a popular choice for floor pads due to its durability and ability to withstand the appliance’s weight and the stresses of wood loading. Additionally, flagstone, brick, block, or other non-combustible materials may be used, provided they meet the same criteria. It’s essential to ensure that any joints between tiles or stones are properly grouted or mortared to prevent debris accumulation and maintain the integrity of the floor pad.
By installing a suitable floor pad beneath your wood stove, you can create a safe and protective barrier that minimizes the risk of fire damage and preserves the structural integrity of your home.
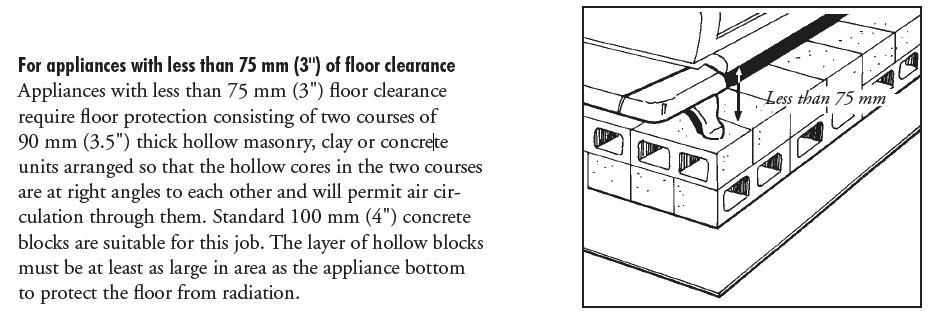
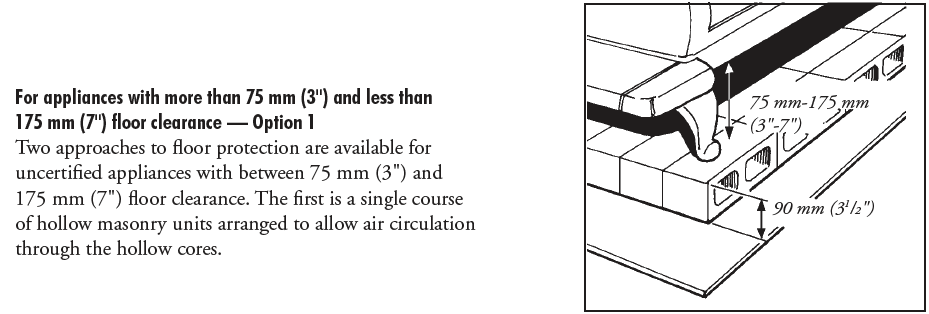
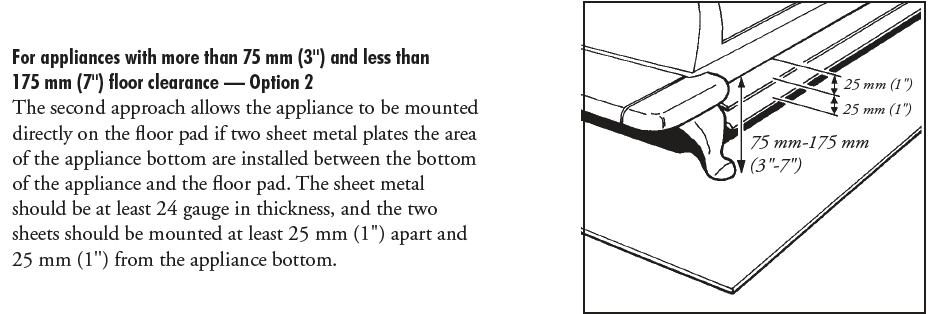
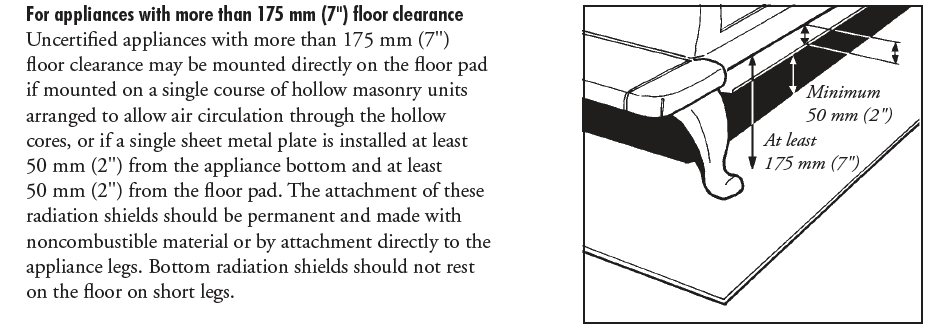
A heat shield is the second crucial element of floor protection for your wood stove installation. This shield safeguards the floor from overheating caused by the bottom of the wood stove. The type of floor protection required depends on the amount of clearance between the bottom of the firebox and the floor:
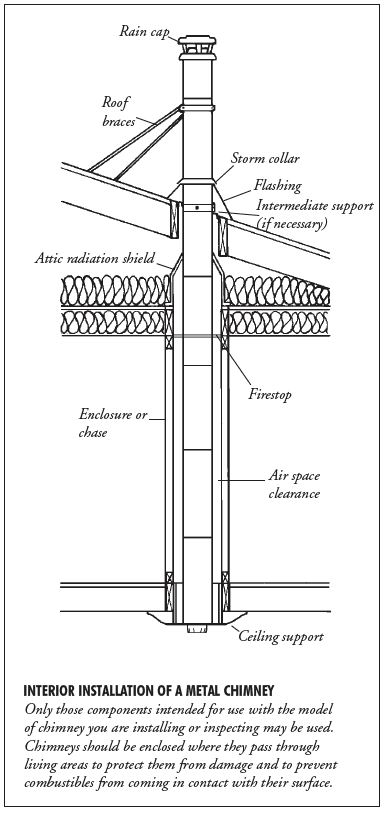
Chimney Considerations
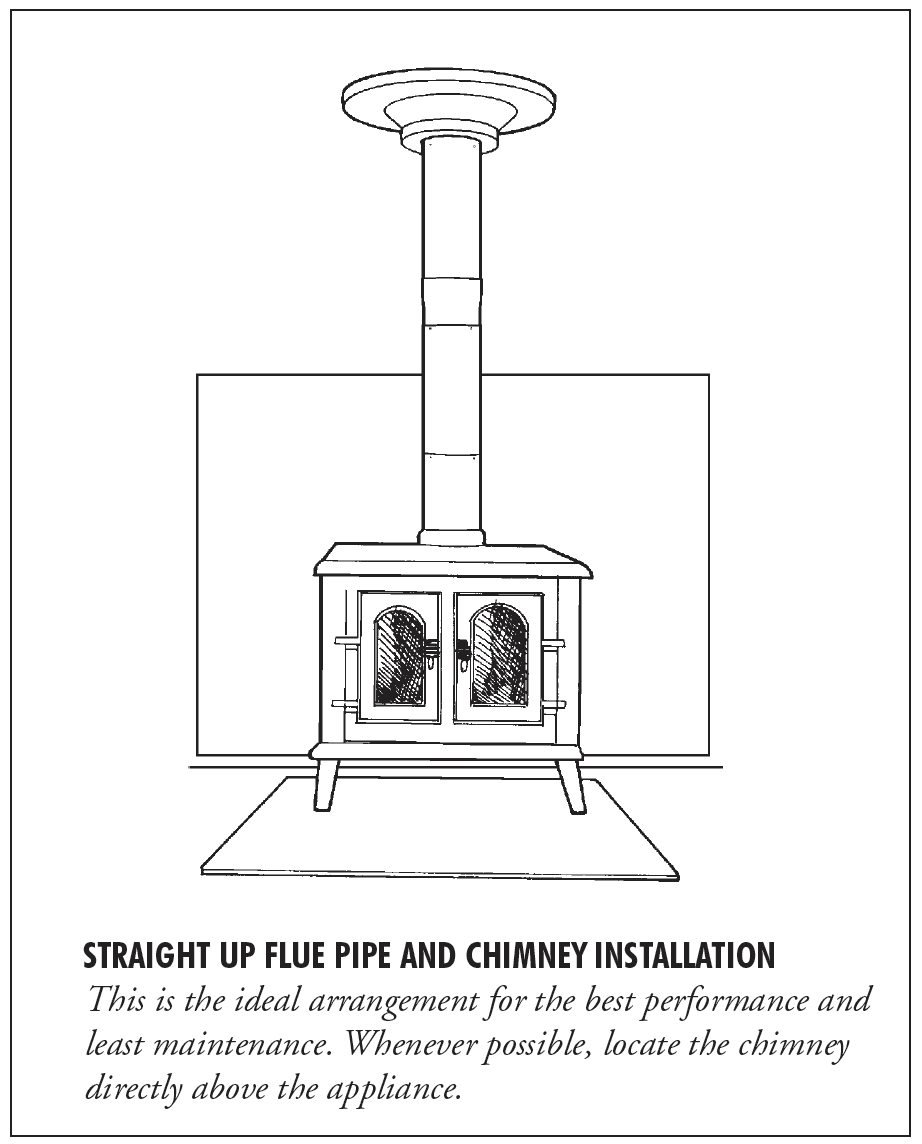
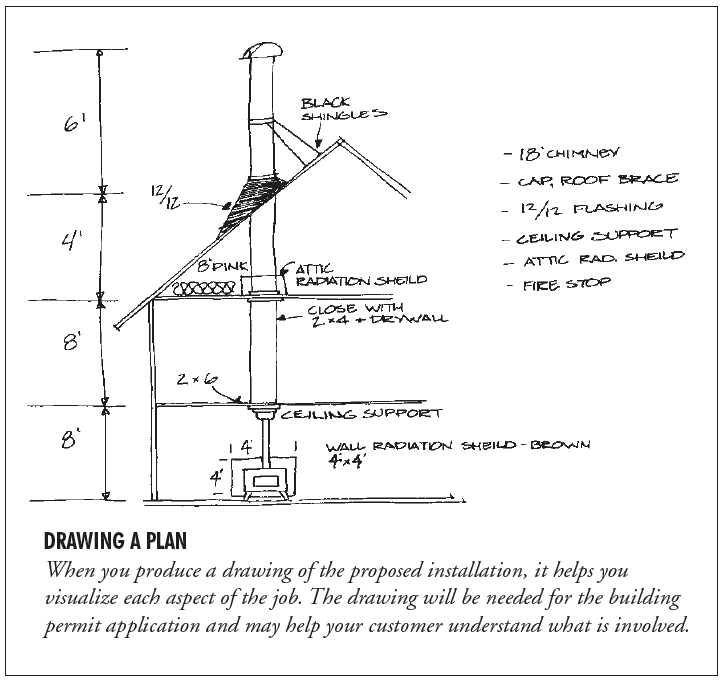
Determining the location of your chimney is a critical step in the wood stove installation process and can significantly influence your fireplace’s final placement. There are two primary options for running the chimney: straight up through the roof or horizontally out the side of the building before turning upward.
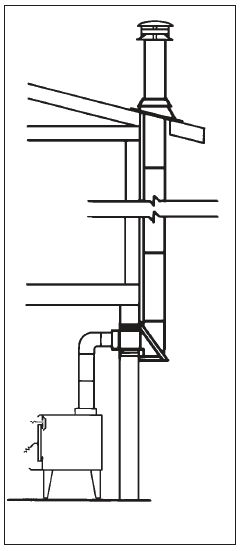
Opting for a straight-up chimney installation offers advantages such as maintaining warmth between burns and facilitating a more efficient draft. On the other hand, running the chimney horizontally out the wall can save time and be easier to install initially.
If you choose the straight-up route, ensure the chimney can pass through all floors, ceilings, and the roof without obstruction. It’s essential to avoid cutting any framing members and to steer clear of power lines or tree limbs.
Remember that fireplace flues and chimneys can accommodate up to 180 degrees of bends, allowing for flexibility in routing. For example, you can incorporate two bends at 90 degrees or four at 45 degrees to navigate obstacles while maintaining proper clearance.
Once you’ve determined the precise location for your chimney, use a plumb bob to ensure accurate placement for the stove.
Certified factory-built flue pipe and chimney products are your best options when selecting materials for your chimney. Follow the manufacturer’s instructions meticulously, ensuring you maintain proper clearances and use all components precisely as intended.
It’s advisable to procure your flue pipe connector pieces and chimney components from a reputable distributor specializing in fireplaces and wood stoves. These experts can guide you through the selection process, provide valuable installation tips, and ensure you have everything you need for a safe and efficient chimney installation.
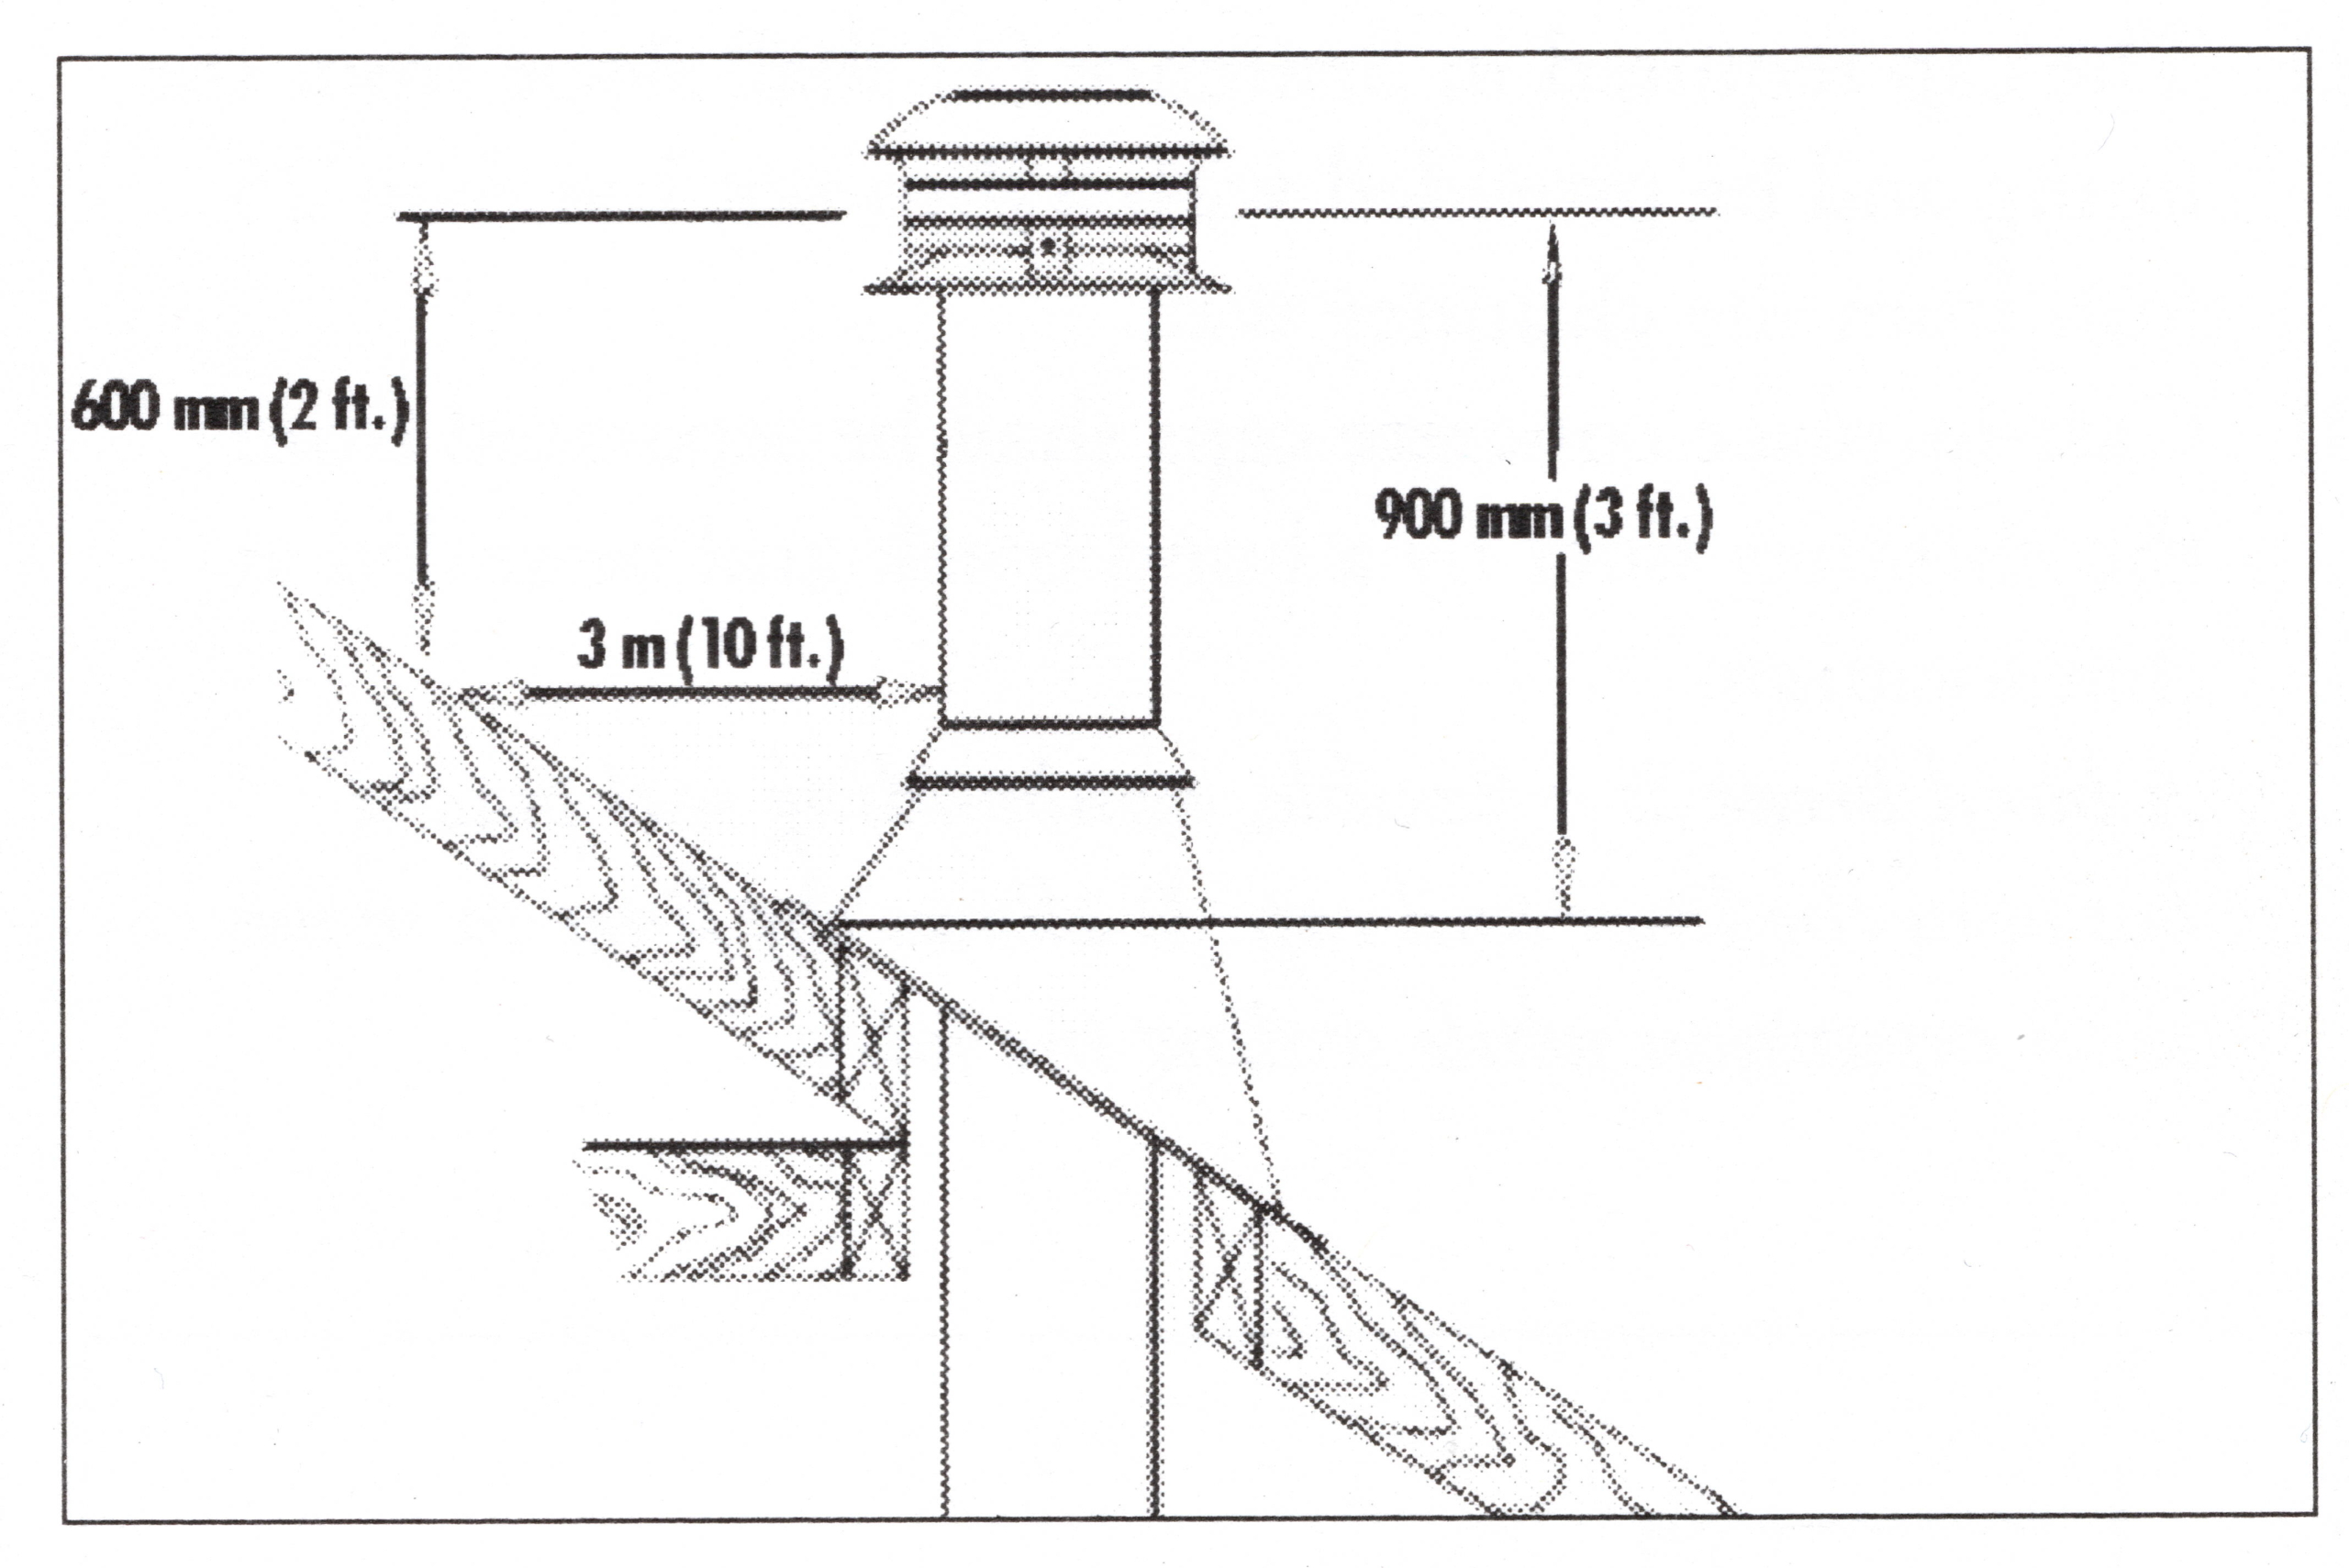
Chimney Height: The 3-2-10 Rule
When considering the installation of your chimney, it’s essential to determine its required height above the roof. This is where the 3-2-10 rule comes into play, providing a straightforward guideline for achieving proper chimney height and clearance.
According to the 3-2-10 rule, the shortest side of the chimney must extend at least 3 feet above the roof penetration point. Additionally, the top of the chimney must be positioned at least 2 feet higher than any part of the building within a 10-foot radius.
This rule ensures that the chimney effectively directs smoke and emissions away from the building, preventing potential hazards and maintaining optimal ventilation. By adhering to these height requirements, you can minimize the risk of smoke entering the building or causing damage to nearby structures.
Additional support is necessary if the chimney rises more than 5 feet above the roof penetration to meet the required height. Roof braces provide the structural reinforcement needed to ensure the chimney remains stable and secure, even in adverse weather conditions.

By following the 3-2-10 rule and installing any required roof braces, you can ensure that your chimney meets safety standards and operates efficiently.
Schedule a WETT Inspection for your DIY Wood Stove Installation
If you have any lingering questions or uncertainties throughout the wood stove installation process, don’t hesitate to ask for assistance. Several reliable resources are available to provide guidance and support every step of the way.
First and foremost, consider consulting your municipality’s building inspector for expert advice and clarification on local building codes and regulations. They can offer valuable insights and ensure your installation meets all requirements.
Additionally, the distributor where you acquired your flue and chimney components can be an invaluable source of information. Their expertise in fireplace and wood stove products makes them well-equipped to address any inquiries regarding installation procedures or product specifications.
Of course, our team is also here to help. While we specialize in WETT-certified inspections, providing thorough assessments of wood-burning appliances and installations, we are not installers. However, we can offer guidance and advice based on our expertise in the field.
Once your installation is complete and approved by your municipality’s building inspector, you will likely need to schedule a WETT inspection to satisfy your insurance provider. This inspection verifies that your wood stove and chimney comply with safety standards and can provide you and your insurance company peace of mind.
Click here to learn more about WETT inspections and schedule with our team. We’re committed to ensuring the safety and compliance of your wood stove installation and are here to support you every step of the way.

Hi, I’m David!
Empower yourself with knowledge and secure your loved ones’ well-being. Join me, a Master Electrician and dedicated home inspector, on a journey of discovery as we delve into the fascinating world of building sciences. Together, let’s make your home not just a structure but a haven for your family. See my bio here.
 Inspection Works