Ice damming is a problem in many homes. It occurs when the roof of a building becomes snow-covered. If the roof deck is warmed from the inside to a point where the snow on top of it melts, that melted water then flows down the roof deck. It then re-freezes when it reaches the overhang. More water continues down the roof and freezes at about the same point. Over time, this freezing of the meltwater causes a dam to occur, and the meltwater builds up behind it where the deck is above the freezing point.
If the roof covering is impermeable, such as on a flat roof, then this is not a problem. However, most roofs are covered with asphalt-based shingles or other layered covering, like shakes or shingles. These coverings are not waterproof but only designed to shed water down the roof. Therefore, if the dam builds up high enough, the water can get in underneath the covering and leak into the building. Water infiltration can cause a great deal of damage to the insulation, structure and wall finishes. In severe cases where the problem is ongoing, mould can develop.
Ice damming can cause interior damage, damage to shingles, and damage to gutters. The weight of ice build-up can bend or twist the gutters. In extreme cases, ice build-up has been known to tear gutters off the building.
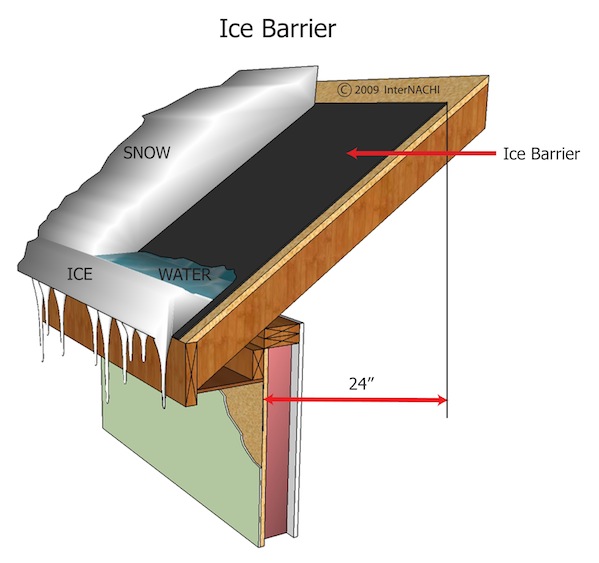
This diagram shows a typical ice dam formation. The ice dam occurs where the roof deck extends out over the side of the building, where heat escaping the house into the attic no longer warms it.
It seems simple enough. All you have to do is keep the roof deck at the ambient outside temperature, and you shouldn’t get ice dams forming. If the air is above freezing, the deck is also above freezing, all the way to the gutters. Any meltwater flows down the roof, falls into the gutters, and is taken away. Below freezing, there is no meltwater forming. It’s as simple as that! As with most things in a complex system, such as a building, it is never that simple!
The fact is that heat escapes from buildings. Whether you put heat into a building with natural gas, solar, geothermal, a fireplace, or some other method, it will find a way out of your house. If that heat hits the roof deck, it may cause the snow on the roof to melt. It turns out that keeping this from happening requires a multi-pronged approach. Let’s work on it from the top down:
One solution to preventing interior damage is to make the roof covering impermeable to water. Roll-on, torch applied, tar and gravel, and peel-and-stick roof coverings are all impermeable when properly applied but are generally not good choices for a sloped roof.
Some people have succeeded with metal roofing, reducing their issues with ice damming primarily due to metal roofs’ tendency to shed snow more efficiently. Metal roofs still have joints, however, and these joints are susceptible to leaking under ice-damming conditions. When placed upon battens with good ridge venting, metal roofing can also provide a layer of thermal separation between the roof deck and the roofing, lowering heat transmission and, therefore, melting. It is not the cure-all some would have you believe, though.
On overlapping-style roofing coverings, such as shingles or shakes, a waterproof membrane or two layers of roofing paper should be applied as a backup layer of protection against water penetration to the roof deck. This protection should be used from the roof’s edge up to 12″ from the inside of the exterior wall. Depending on the roof’s slope, a single run of standard-width membrane may not offer enough protection. The intent is to provide a waterproof layer against the roof deck should water back up behind the lower shingles on the deck. Depending on the severity of the ice dam, this may not be enough protection.
Regardless of protection, damage from ice dam formation can still occur to the roof covering itself and the gutters.
Ok, so let’s keep the heat out of the attic with more insulation.
That sounds great, and indeed, it was touted as the answer to the issue at one time. However, there are a couple of problems with that idea:
Insulation does not stop heat flow. Insulation resists a transfer of heat but never stops it completely (R-value, that number you see on insulation bales and is much-touted when talking about how insulated a building is, is defined as resistance to heat transfer). From a practical standpoint, you can put only so much insulation into a given space. Complicated structures, such as semi-bungalows or homes with vaulted ceilings, offer particular challenges to using insulation to solve ice damming problems.
Older homes were not as airtight as homes are today. Ceiling light fixtures and other penetrations also allow conditioned air to escape into the attic. If you can access these holes, sealing them can go a long way towards lessening the heat lost to your attic.
Using the correct type of insulation is essential as well:
Fibreglass insulation does not offer a great deal of resistance to airflow. Blown-in fibreglass, used extensively in attics due to its ease of installation compared to batt insulation, is particularly poor at reducing heating loss due to leaking air. Fibreglass also has an inferior performance curve as the temperature lowers. Studies have shown that at 0℃, fibreglass insulation offers about half of its rated R-value. Just when you need it most is when it performs the worst.
Blown-in Cellulose insulation, at greater than 3″ thicknesses, has been proven to reduce heating losses due to airflow. It also holds up better in the cold, with its R-value not too dependent on air temperature. This makes it a great choice for attics, especially attics in older, more leaky homes.
The best type of insulation for attics, indeed for your entire home, is spray foam. This type of insulation offers a great R-value per given thickness. It also seals insulated surfaces tight against airflow. Many people have found success spraying the bottom side of their roof deck with foam. Not only does this help keep heat from reaching the roof deck, but it also can create more conditioned space in the home, a decided advantage over other insulation methods. Given the correct insulation thickness, the heat transfer rate to the deck may be low enough that melting does not occur. However, it can be pretty expensive to have this work done.
No matter what type of insulation you choose, heat will eventually reach the roof deck. Taking that heat away from the deck leads us to what is, in most cases, the key to solving ice damming problems.
Understanding Ventilation
Roof ventilation is one of the least understood dynamics in home building and maintenance, primarily because roofing contractors usually handle roof ventilation. Many, if not most, roofing contractors get their information primarily from companies based in the USA. In most of the United States, the biggest roof ventilation concern is getting rid of heat build-up in the summer. The extreme heat that can build up in an attic and on a roof deck under a blazing sun at high ambient temperatures can damage the roof covering, to say nothing of what all that heat trapped in your attic can do to your air conditioning bill!
The challenge is precisely the opposite in most of Canada. While our summers can get hot, and the sun still bakes our roofs, it is in the winter when we need to get the heat out of our attics the most. Very little literature from the major roofing manufacturers talks about this critical dynamic. Holding the heat in the house sounds like a great idea from an energy savings perspective, but having that heat in the attic warms up the roof deck and causes ice dams to form.
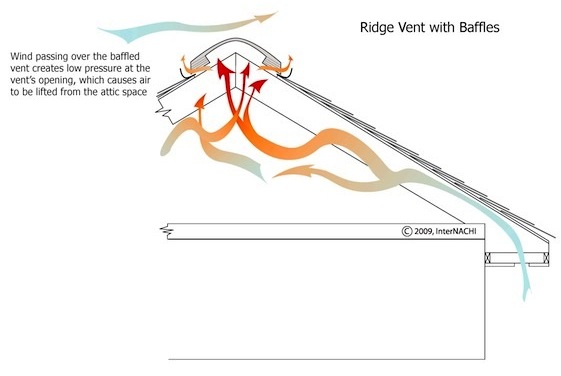
In a perfect world, the attic of every house could be ventilated like this.
Ambient-temperature air enters the attic through the vented soffits and flows through the joist space above the edge of the building. As the air in the attic picks up heat from the house’s interior through the insulation or air leakage, it warms up and rises. At the highest point in the roof, an opening (vent) allows the heated air in the attic space to exit, keeping the roof deck cool, and voila! No ice dams!
Of course, the natural world seldom works this way. Add snow cover, and the ridge vent might not work. Often, soffit vents are missing or blocked. Improper attic insulation installation can block the rafter space so air cannot travel from the soffit space to the attic space. Those ubiquitous “mushroom” style air vents commonly used on roofs are often buried in snow and rendered non-functional. Again, when we need them the most, they fail to perform. If you add on additions and other changes in structure, this type of ventilation may be impossible.
Vaulted Ceilings
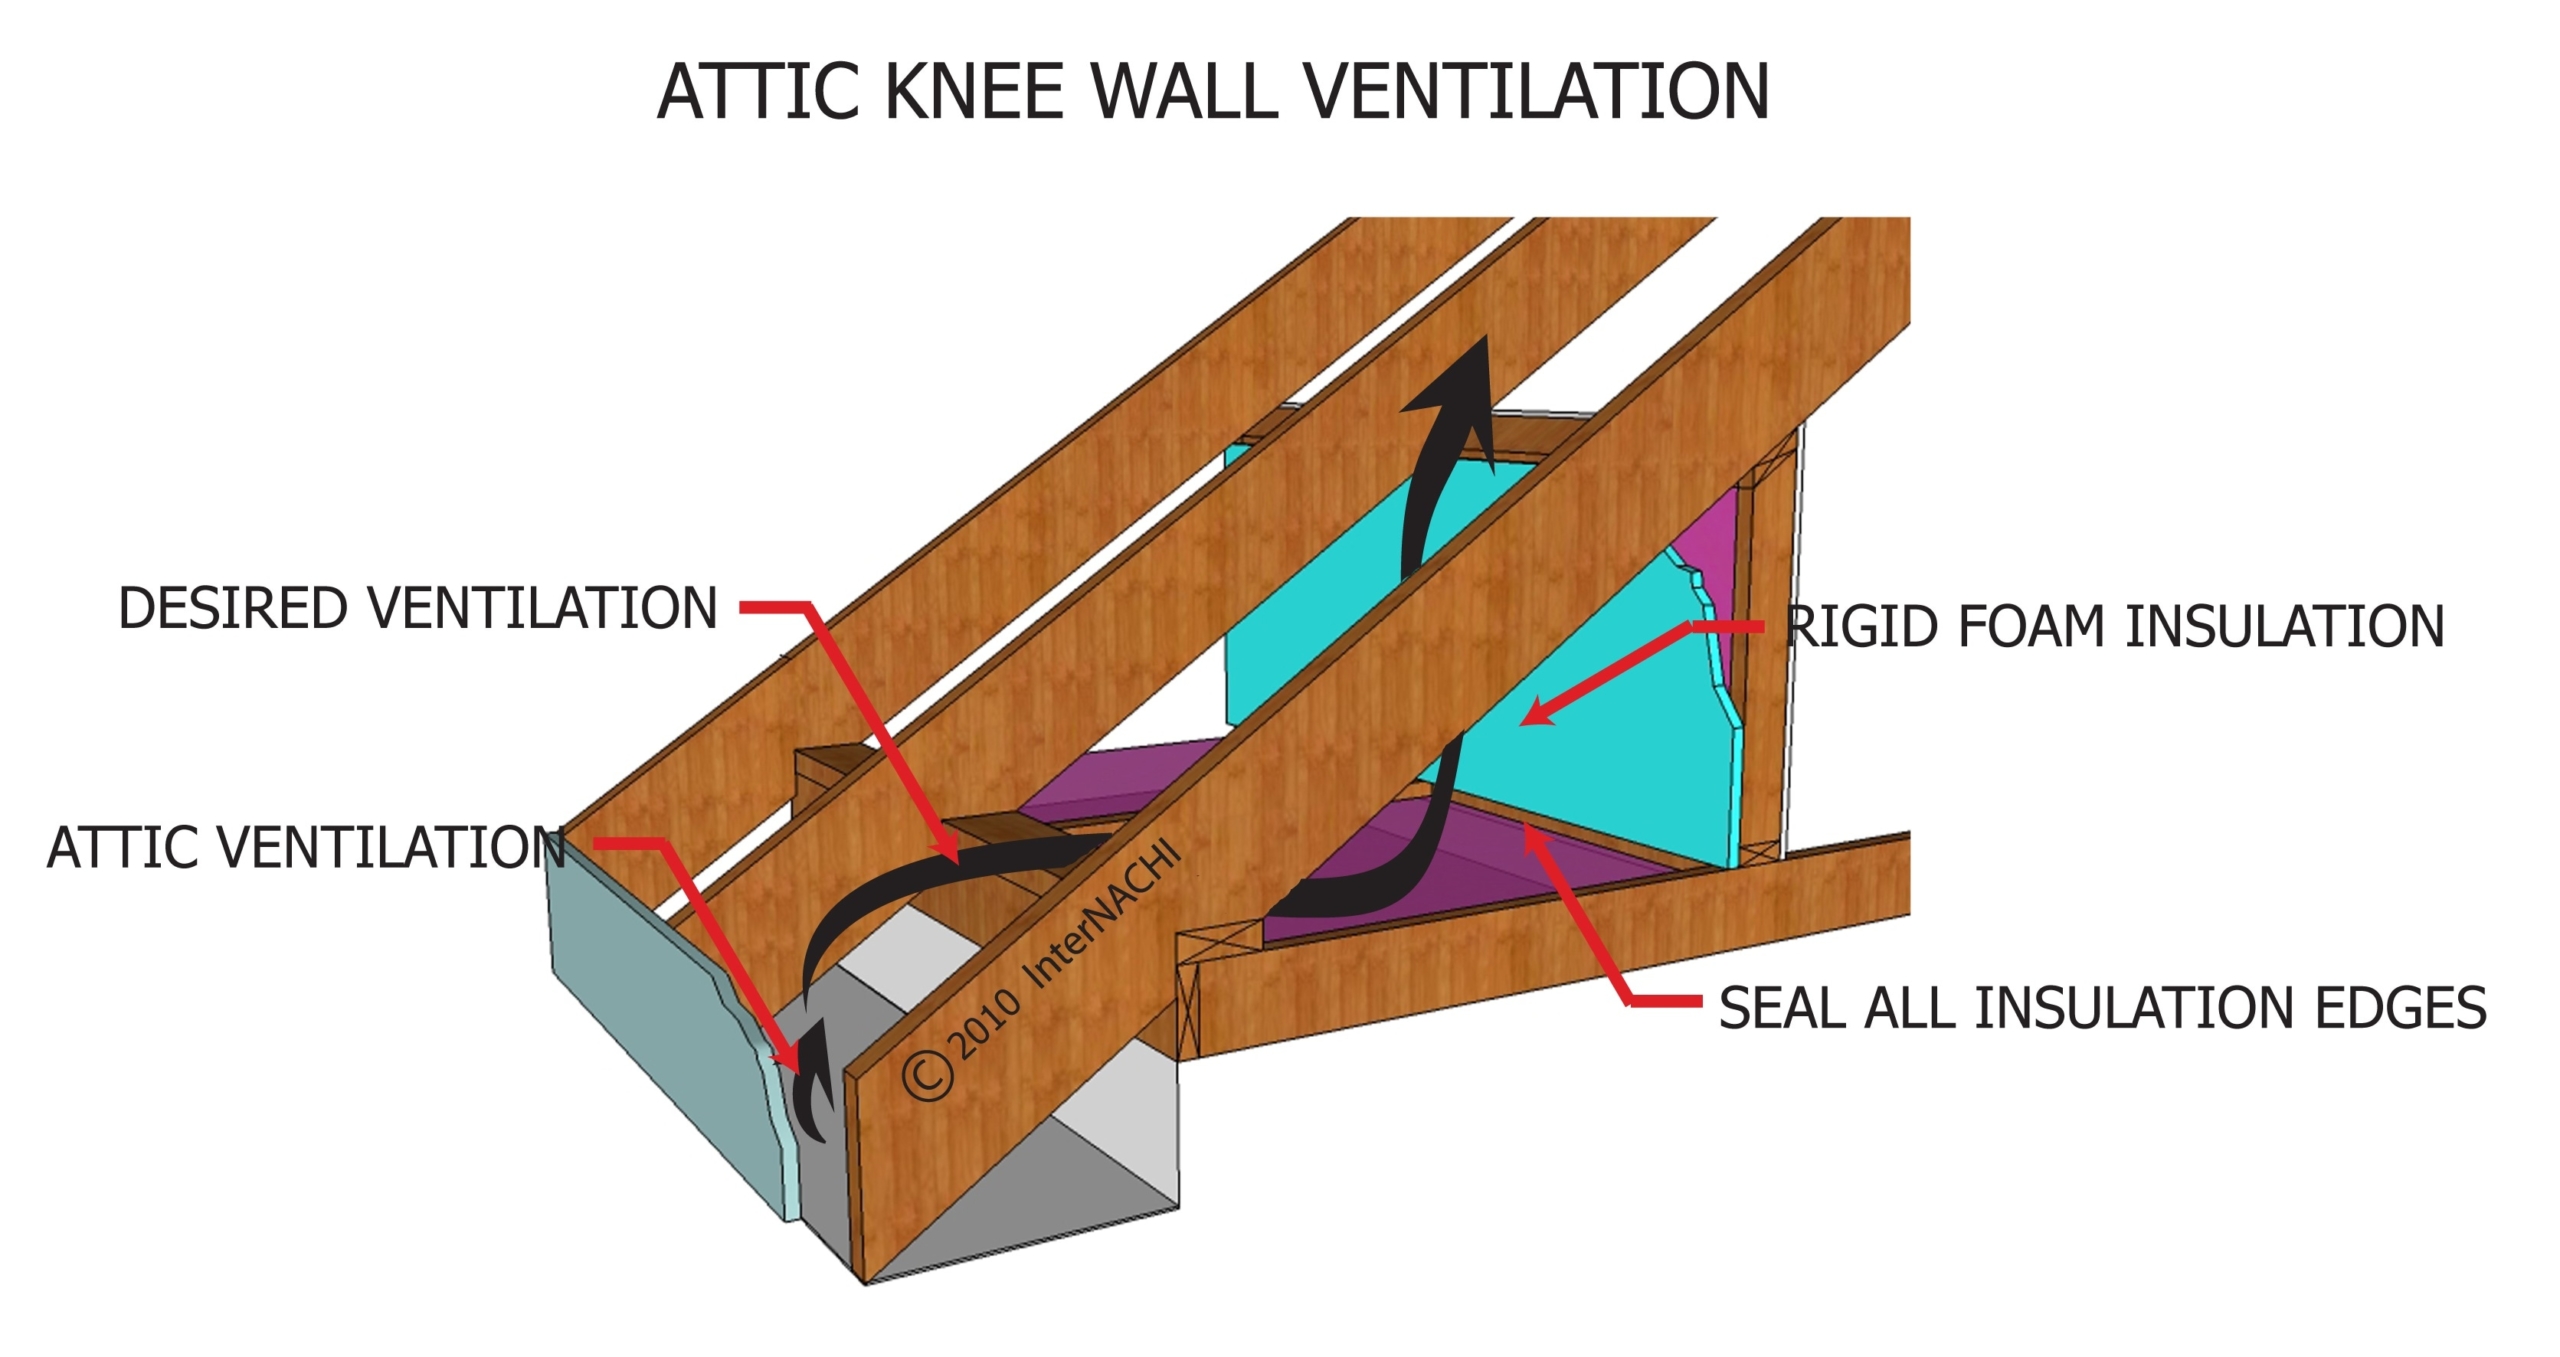
Homes with vaulted ceilings, and semi-bungalows in particular, present additional challenges. Here are the best solutions to properly venting those spaces:
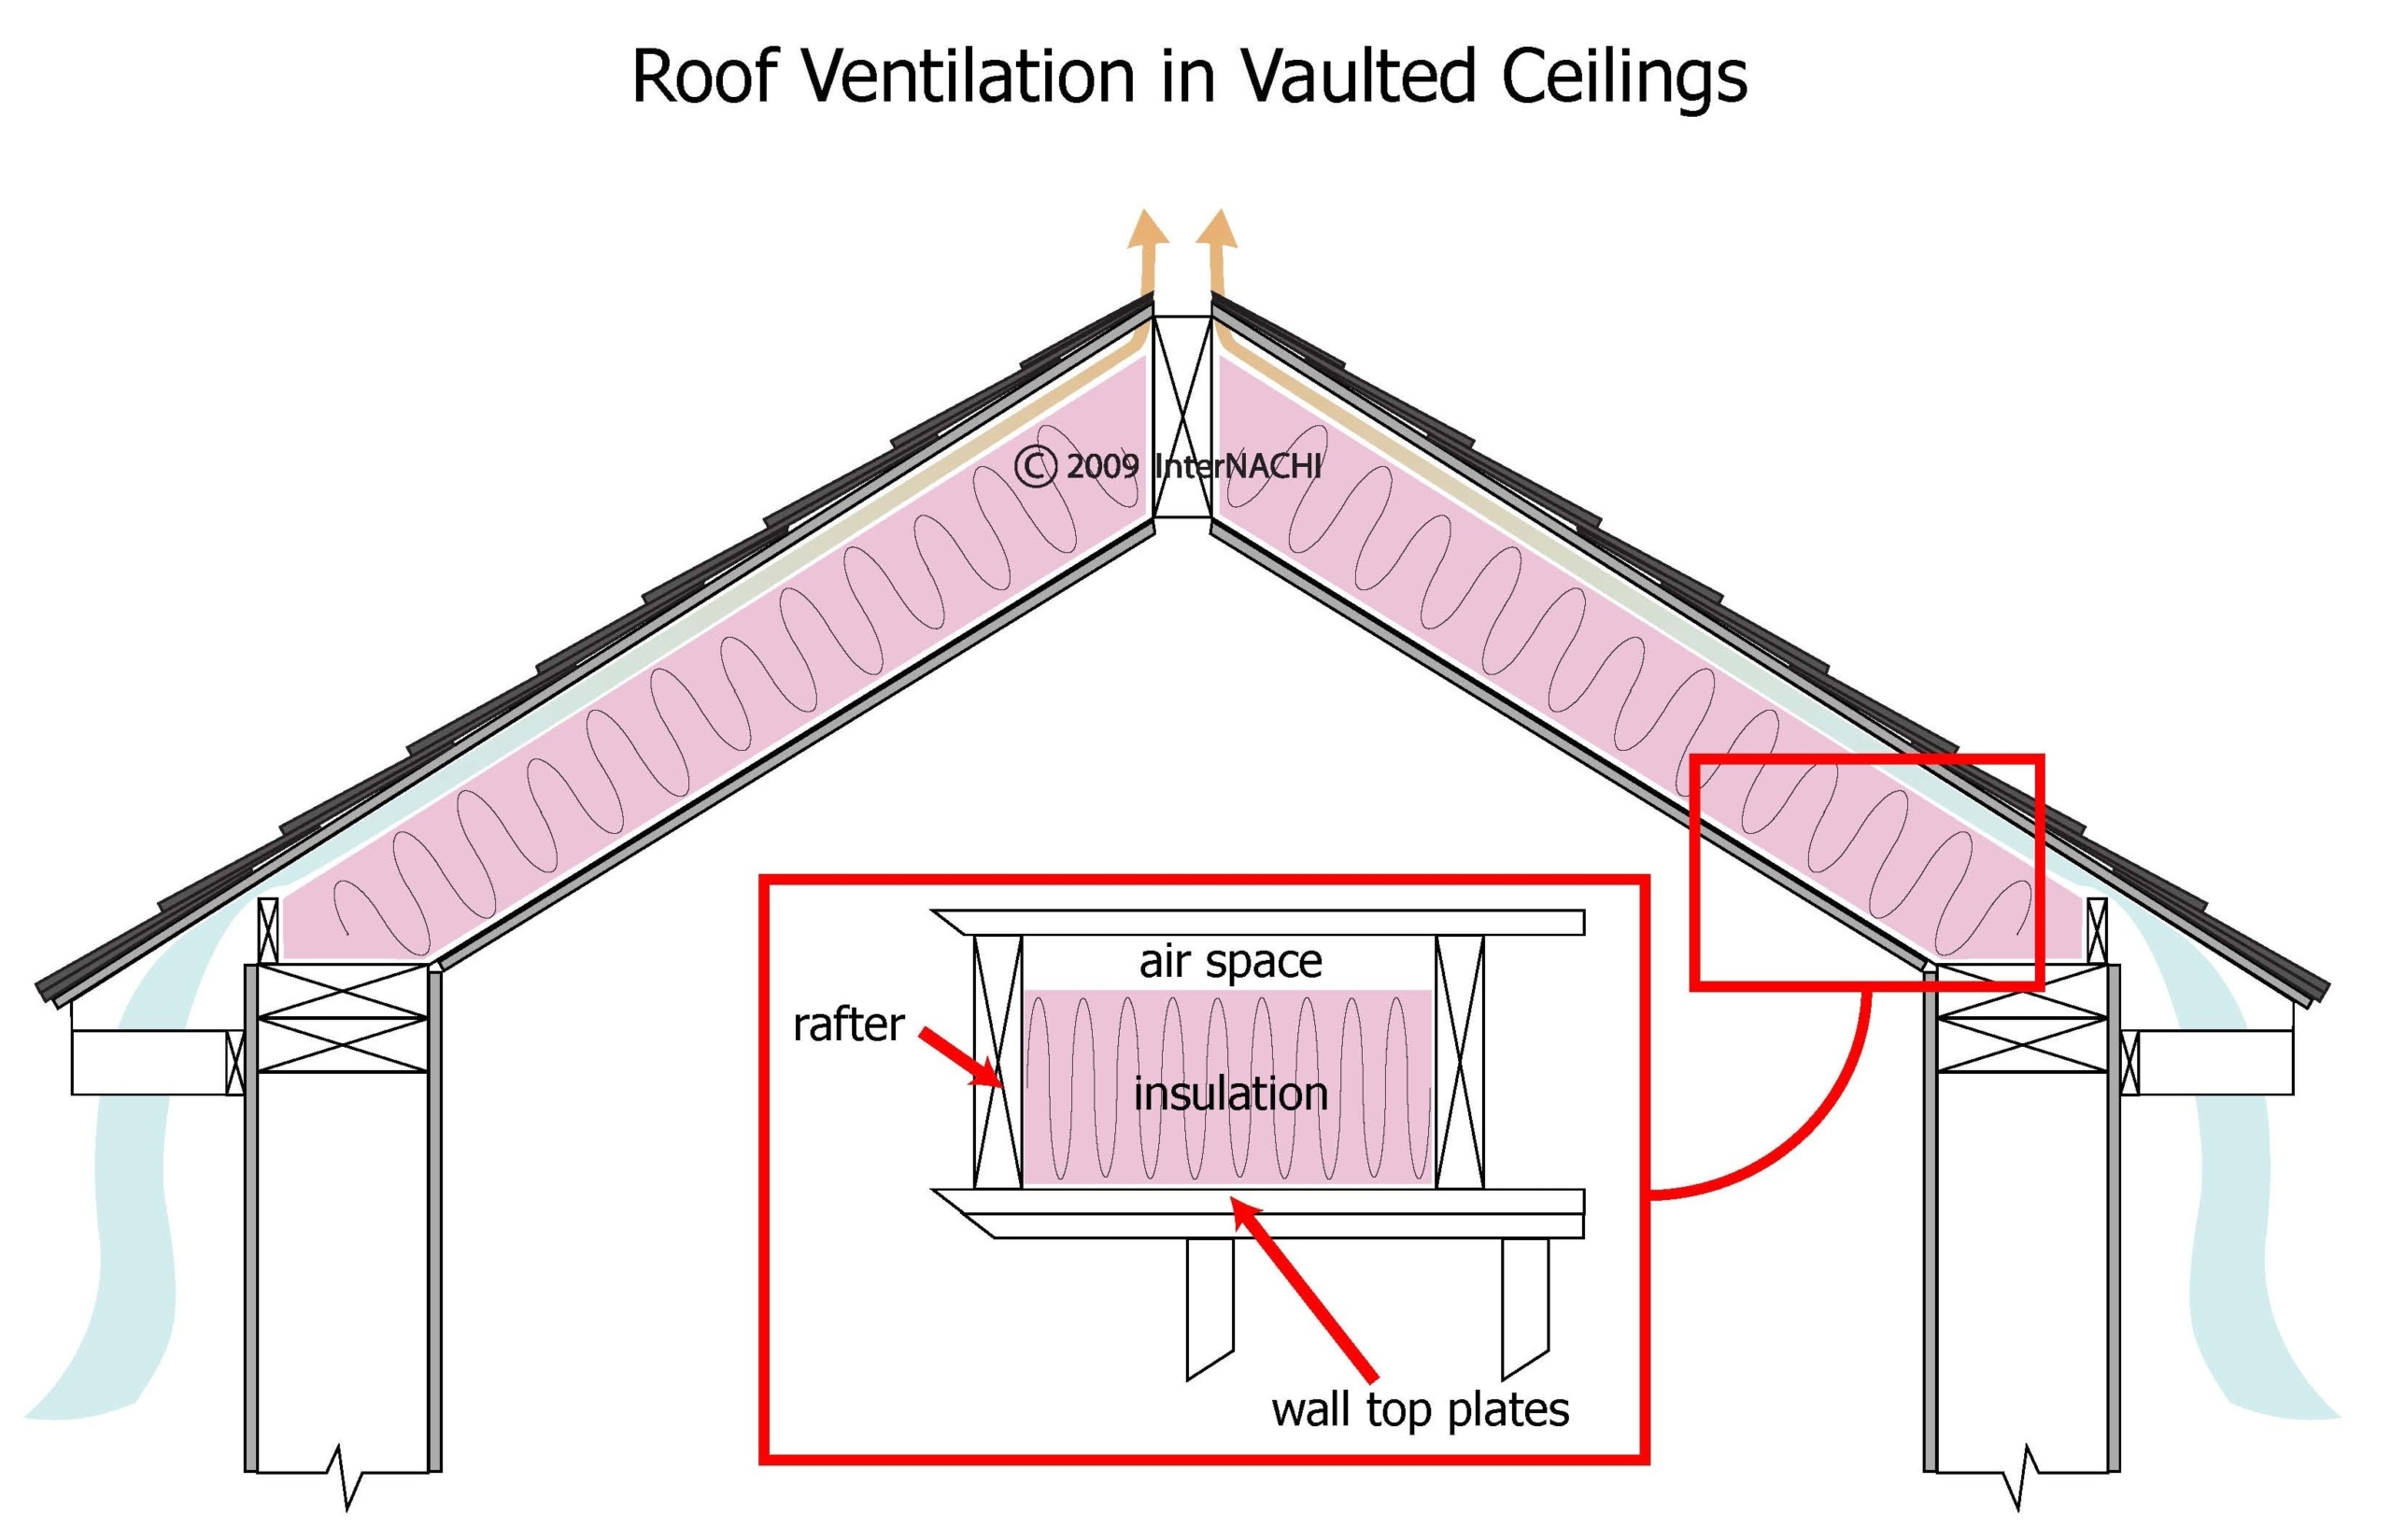
Vaulted spaces should have an air gap to provide ventilation.
Side attics should have an air gap to provide ventilation.
Once again, the real world can interfere with this perfect application of theory. Typically, in vaulted ceilings or the sloped portion of a semi-bungalow ceiling, the builder will pack the space with as much insulation as possible to gain the most R-value they can. And I have seen it packed! Packing fibreglass into areas decreases its insulating qualities. If you stuff 6-inch-thick R20 batt insulation, generally for a 2×6 wall or ceiling, into a 2×4 wall or ceiling, you’ll end up with less of an R-value than you would have had you used the standard 4-inch-thick R-12 batt insulation. So often, in an attempt to handle a difficult-to-insulate area, the builder will make things worse, to say nothing about the fact that there is no way air can get to the roof deck to cool it off.
The real world tends to be about compromising and coming up with the best solution, recognizing all the factors involved.
Exhaust and Intake
Some contractors and homeowners assume that the attic is well-ventilated because they put in a couple of vents or a big turbine vent. The style and placement of those vents are critical to proper ventilation. The laws of physics do apply!
Warm air rises. Many people correctly figure that to let warm air escape, they should place vents as high as possible. They often forget that more air must enter for that warm air to escape. In our perfect example, that is cool air from the soffit vents. We try to get as close to that ideal as possible by providing intake air as low as possible and placing vents for exhausting air as high as possible in the space. Typically, you should have one square foot of open space ventilation, both intake and exhaust, for every 300 square feet of floor space. For instance, if your home is 1800 sq. ft., you should have about six sq. ft. of exhaust and intake ventilation.
In semi-bungalows, install gable vents as low as possible and as close to the eaves of the knee wall space as possible. Combined with roof deck vents placed as high as possible and closer to the roof’s centre, this has effectively reduced ice damming problems.
See the best ventilators to use for your Canadian attic space.
So, let’s recap
Ice damming is caused by heat warming the roof deck and causing snow on the roof to melt. Solutions to ice damming should primarily be concerned with keeping the roof deck cool. This can be accomplished by reducing heat escaping into the area below the roof deck as much as possible by sealing air leaks and insulating correctly. Proper ventilation of the space under the roof deck is critical to removing heat. The placement of vents is central to allowing air to enter and exit the space, facilitating heat transfer from under the roof deck. The standard rule of thumb for the required ventilation is one sq. ft. of exhaust and intake for every 300 sq. ft. of floor area.
This amount of ventilation may seem like a lot. The vents on the roof may not be the most attractive, depending on where they need to be placed and how many separate areas need to be ventilated. Still, vents are essential in preventing the damage that ice dams can cause to your home’s interior and exterior.

Hi, I’m David!
Empower yourself with knowledge and secure your loved ones’ well-being. Join me, a Master Electrician and dedicated home inspector, on a journey of discovery as we delve into the fascinating world of building sciences. Together, let’s make your home not just a structure but a haven for your family. See my bio here.

Hey there, I’m Mitch!
Ready to dive deep into the world of home inspections? Join me, a Certified Canadian Home Inspector and construction veteran, as we unravel the mysteries behind your home’s inner workings. Let’s ensure your peace of mind and the safety of your property. Check out my bio for more details!

